
 |
| Thinking ahead, I started work on adding some ground cover before completing the platform for my goods shed. |
These days us modelers are spoiled for choice when it comes to adding ground cover to our model railways. There are ready-made scenic mats, static grass fibres, flocks, scatters, scale dirt, rocks and ballast. It seems we've come a long way since the days of my childhood when I would paint my layout base green and scatter some beach sand on it while still wet for special effect. So, armed with some Chuck's Ballast Supplies No 2 Karuah crusher dust, Marulan fine ballast and genuine loco ash, plus Woodlands Scenics T44 burnt grass flock and B74 fine light grey ballast, I applied the ground cover to the area surrounding my goods siding before completing the platform for the goods shed.
 |
| After adding the scenery product to a glue painted surface, I then drip-feed glue over the entire area. |
When ballasting or adding ground cover to my layout, I still prefer the tried and true 50/50 solution of Selleys Aquadhere PVA glue and warm water, with a couple of drops of dishwashing liquid thrown in for good measure. The dishwashing liquid helps the solution penetrate the ground cover materials, while the warm water speeds up the drying time. I start by painting the base with a thin coat of the solution so that the materials will bond to the surface, and then get to work hand sprinkling the different layers of dusts and scatters into place. When happy with the amount of coverage, I then use a container of the diluted solution I have made to drop the PVA mix carefully on top of the ground material until the white glue penetrates and floods the whole area.
 |
| Remember this photo from my last post? This is what the flooded glue should look like when applied. |
A damp, rolled Chux cloth makes a handy glue containment line if you're wanting to protect areas from your layout, like my channels for the perspex that I will add to the layout front, from being inundated with glue.
 |
| I gently pulled my Chux cloth containment line out while the ground cover surface was still damp. |
I wanted to add some static grass tufts to my layout, so after purchasing some 4 mm ready-made grass tufts from Leadbear's Tufts on eBay, I thought I'd save time and apply them before adding the glue and scenic materials. That proved to be a disaster.
 |
| My first attempt at adding scenic grass tufts was a failure. So I pulled them all out while the area was still wet. |
The grass tufts I used came ready to peel and stick using a pair of tweezers. Me being the kind of modeler who builds everything strong enough to stand on and able to withstand a hurricane, I thought gluing the tufts into place would make them more resilient to the vacuum cleaner when doing general maintenance at a later time. Instead, the grass tufts only drew the glue solution up into the fine grass fibres causing a matted mess of goop. Using the same tweezers that I had painstakingly applied the grass tufts with, I pulled them all out while the glue solution was still wet.
 |
| Leadbear's Tufts are self-adhesive, meaning you just peel them off using a pair of tweezers and apply them to your layout. |
The Leadbear's Tufts it turns out are able to easily withstand a vacuum cleaner. Coming in a pack of between 120 and 140 individual self-adhesive tufts, you just peel them off using a pair of tweezers, and position them straight onto your layout. Fortunately I only wasted about a dozen with my ill-fated first attempt.
 |
| The finished result, applying the grass tufts after the ground cover had fully dried and hardened. |
The tufts stuck just fine without the need for additional glue to any dry surface, and once the ground cover had fully dried, (I allowed 2 days just to walk on the safe side of caution), I went nuts applying them wherever I wanted. Wherever I thought weeds were likely to have sprung up on a long established goods siding, I stuck a clump down, alternating between the wild grass and dry grass varieties I purchased.
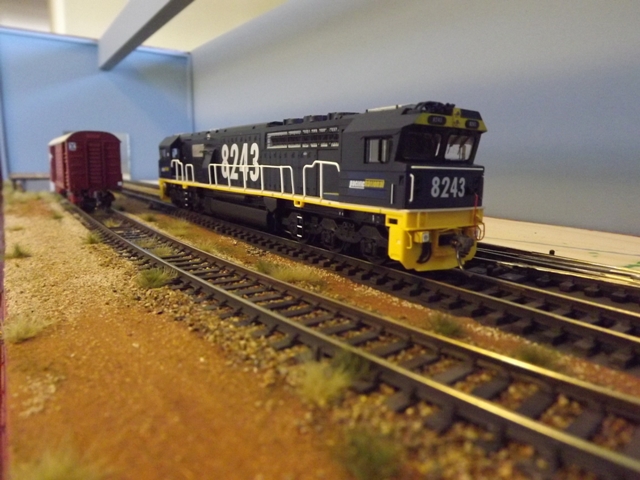 |
| And a final look at the goods siding between the layout edge and the No 2 road. |
The scenery along the completed goods siding also highlights the tyre ruts I fashioned into the Karuah crusher dust by running a damp paint brush up and down the ground cover while still wet. With just the right amount of gravel thrown down at a logical unloading point, and a good balance of ballast, dirt and weeds to suggest this is a sporadically used siding somewhere in western New South Wales, I'm wrapped with the end result. So, with the platform for the goods shed now complete, the goods siding ballasted and the surrounding ground cover in place, my thoughts can now turn to ballasting the No 2 road and working on the railway station platform. But as usual, that is a story for another day.
See also; Modelling using polystyrene foam and Using different ballast colours
No comments:
Post a Comment
Thanks for taking the time to visit Philden. I hope you'll book a return ticket soon. Cheers, Phil