Showing posts with label model building. Show all posts

Wednesday 10 May 2023

Trees by The Harbour

Some new trees ready to be planted by Philden Harbour.

This is my haul from Modellers Warehouse at the recent Brisbane Model Train Show. This year's show felt like a bit of a kickback to the model train exhibitions of the 1990's, with a queue almost 800 metres long before the doors opened on the Saturday, and thanks to the today's pressing economy, about the same amount of money in my pocket as I once rocked up to the door with in 1999. Thankfully I had a list of what I needed. And unless it was on the list it, it couldn't come home with me. No matter how much I was tempted.


These towering pine trees came from a bargain bin and could be cut down to size.

What did prevail was some serious 1990's thrifty shopping. I was on the lookout for something that could resemble some Norfolk Island Pines, and I found a pack of North American tall pines that I hoped could be trimmed to size. Not only were the trunks easy to cut, but the base of the trunks with the lower branches could be turned upside down and planted to resemble a not-so-healthy tree. There were 5 trees in the pack marked down to half price on account of the packaging looking a little shabby, but I'll get 10 trees from this packet.

The patchy-looking pine was a perfect fit for between the two tracks beneath the overpass.

The Norfolk Island Pine will help screen the transition to what is presently my staging shelf, while I'll keep the other 4 to plant on the otherside of the module's corner post when I rebuild the staging shelf as an extension to my harbour scene. The thick clump of trees will help buffer the two scenes and disguise the join, and getting them now means that I don't have to worry about matching colours in the future.

Palm-ies by The Pub!

Next up, I wanted to continue to transform my layout into something a little more Troppo, without relying purely on the backdrop to make a statement. A week before the show I FaceTime called a friend who happened to be shopping at Modellers Warehouse down in Slacks Creek in Brisbane, and after getting a video call walk through of the store, including a friendly wave from its owner Tyson, my friend grabbed whatever palm trees that were in stock and dropped them around on his way home. So after that VIP service, I planted two Coconut Palms and a Washington Palm in the space between the bus depot and where the verandah deck of the Jetty Hotel will overhang the gardens. This adds some coastal vibes for the future customers to enjoy a Parmy under the palm trees when my pub is open for business.

Going a little bananas here, but these will simply represent some wild banana trees growing alongside the rail corridor. Not a working banana farm.

When you think of Coffs Harbour, you think of the Big Banana. So Philden Harbour needed something to place it in close proximity. I've used these MP Scenery Products banana trees before with great success. As with a lot of scenery products that are produced in Eastern Europe, there is still a shortage of products as the Ukraine war continues to impact markets in neighbouring countries. I grabbed the only packet that was available, so for now will have to be content with just the 4 banana trees growing wild alongside the rail corridor. Another 2 Coconut Palms and a second Washington Palm complete the vegetation on the otherside of the tracks from the Jetty Hotel gardens. They add a foreground feature that doesn't obscure my view of trains passing beneath the Philden Street overpass. (Yes, the name of the overpass has stuck from my previous layout, and seems fitting given that it will divide the Philden Harbour yard from the soon to be constructed Philden Beach Station).

My ex-NSW 422 headed up the first train to run beneath the palm trees.

The rail corridor needed some thin vegetation along the front of the layout. These suit perfectly.

The Norfolk Island Pines help soften the exit to staging for now...

...while the green belt either side of the overpass will help disguise the future layout extension.

So, a little bit of model greenthumbing followed this year's Brisbane Model Train Show. The show marked 4 years since I last exhibited a layout, and that was the final showing of my former layout Philden. As you can see in the above photo, only the tram tracks remain to be pulled up off Philden Street and the Jetty Hotel completed to say that this half of my layout is finished. The layout will then be a complete coastal version of the switching yard I set out to build with Philden Street Yard. Which gets me to thinking... should I exhibit this layout in its current configuration at some point this year before I get to rebuilding the staging shelf into the Philden Coast extension?

Given that my Philden Coast extension might take the best part of 18 months for me to complete, debuting this layout at a small show here in Brisbane might be my only opportunity to display this between now and 2025. It's something to think about.

In the meanwhile, stay tuned for an exciting announcement in the coming weeks.

Untill next time...

Monday 27 March 2023

The Historic Haunted Bookstore


Here's a tale of a much travelled bookstore. This building began its life as a laser cut kit of the Walker Models Bait, Tackle, and Fish n' Chip Shop, originally planned for a prominent foreshore position on my Philden Road layout before being repurposed to sit above the Philden Street overpass on my follow-up layout Philden Street Yard, (see my Philden Museum page for more).


Here it is sitting at the top of Philden Harbour's planned beach on my Philden Road layout...

...and here it is prior to being cut-in-half, to fit a position on my Philden Street Yard layout.

The building was started, before work on it was paused for two years while I reconstructed my shelf layout into what became Philden Street Yard. The double premises storefront was then carefully cut in two to stand in its current position atop the overpass. I have saved the parts that make up the rest of the building to rebuild as a separate standalone structure elsewhere on the layout at a later date.

The MDF sections of a laser cut kit can be terrible to kitbash, as even a sharp hobby knife tends to splay the cuts and cause the fibres of the pressed board to fan out, but taking my time, (as if two years wasn't already long enough!), I was able to slowly cut, sand and fit the structure's shell into its new smaller configuration. The rest of the process just followed as per the instructions, remembering to trim the outer shell of the finer laser cut birchwood to fit the front and rear of the building.

For the side walls however, I decided to model them as aged, rendered concrete walls, something which I am going to cover in my Model Railway Weathered Wonders book. So after masking off the front and side walls, I spray painted them with an ordinary rattle can and spent a considerable amount of time distressing the paint as it hardened. As you can see, the end results look a little different to some of my other buildings.

Once dried, I sealed it with some acrylic matte clear coat and could then get to work finishing the structure as a bookstore that I had planned for my inner Melbourne themed layout.

Inside, the building was detailed only where the sight line would be visible through the large front glass windows. Choosing to model a haunted bookstore, I added some cheap discount store Halloween buttons to the store's interior.

The part-finished structure then fitted into its original planned location on Philden Street.

Despite finishing the majority of the structure over the Australian summer whilst watching the cricket on TV, by the end of 2022 there were some things about the layout that were preventing me from progressing any further and work on the building was once more halted.

Model railroading is a fully immersive hobby, and the eras we model and the trains we collect are often tied to memories. So early in 2023, thanks largely to changing my layout's backdrop, Philden Street Yard was quickly and quietly transformed into what I had originally set out to model following the demise of my original Philden layout. The shelf layout, along with the structures and trains on it, could now be tied to some great memories of my own family holidays on the NSW North Coast, while the ghosts of the past stirred up following the loss of a family member late in 2022 were once more free to leave. Or in the case of the Historic Haunted Bookstore, serve as a reminder that we can champion over them.

I now have to do something about those former tram tracks! The locals are complaining...

So ignoring the road repairs that are ahead in order to remove the tram tracks over Philden Street, or is it Philden Road? I'm so confused... HARBOUR BOOOOKS, the Haunted Bookstore is now open for business at the top of town. I custom designed and printed the bookstore signs using the same program I design all of my book covers with. You may even be able to glimpse some model ghosts inside the bookstore, such as the floating spectre of the second floor. It should become more visible after I add some interior lighting to the building.

The cartoon pirates on the bookstore sign are supposed to be my wife Denise (L) and myself (R).

As the section to the left of the bookstore will become the join line for the second module, I will soon start planning the transition down to the waterline for my imaginary rendition of a mini Coffs Creek scene. As my grown adult children are all into finding these hidden bits of trivia planted in movies known as easter eggs, the writer in me couldn't help but start planting some smaller details that hold greater meaning within this layout. You'll notice on the window of the bookstore is a poster advertising my first novel, The Long Way Home. I toured with that book back in 2009, (see here), visiting Coffs Harbour in the process. Even one of the chapters within the book takes place on the foreshore by Coffs Harbour Jetty. As the layout now centres roughly around a period of time from 2005 to 2015, it seems a fitting clue to hide, as do the other book covers from my subsequent novels that are to be cryptically hidden on the layout.

So, after completing a bookstore that has historic ties to three of my layouts, the Jetty Hotel is the next long overdue structure to complete, and I'm already thinking of what details I can hide within its walls. Time will tell...

Thursday 6 December 2018

Phills Harbour Travel Centre


Back in the 1990's when Countrylink was rolling out its' new corporate image across New South Wales, some of the key regional railway stations dating back to the steam era were replaced with modern, spacious, brick and air-conditioned structures dubbed as Travel Centres. Grafton, Lismore and Coffs Harbour are three such examples that spring to mind, and the city of Phills Harbour on Philden's Beach Extension is no exception, with the new Countrylink Travel Centre nearing completion opposite the harbour foreshore.

The foundations are embedded into the platform and pressed hard up against the backdrop of Coffs Harbour.

It seems that straightening the beach extension back in July may have been the best decision I made before moving ahead with the new layout extension, as it left me with enough room to build a structure sizeable enough not to be called a building flat. The curved platform and track angle that ends in the corner of the shelf called for the station to be confined to the mouse-hole end of the layout, and having already built the box housing that will hold the structure in place on the platform, it was time to turn my basic plastic kit into something else.

Printed brick paper covered in vinyl adhesive film makes for a shiny-clean tiled floor.

The structure was in fact a cheaply produced convenience store kit bought on eBay and posted from China for less than ten bucks. But as is often the case with bargain-priced anything, you get what you pay for. In this case a plain grey one-coloured shell with no provision for glass window panes. Keeping the floor unattached from the building shell for when I come back to add figurines at a later date, I first covered the interior floor with some self-adhesive printed HO scale brick paper. Being a printed paper surface, I also covered the brick paper with clear self-adhesive plastic book covering to protect the printed surface, trimmed it to size with scissors and stuck it to the floor area. I next used some of the pieces of the kit intended to be the roof mounted sign, to fashion a booking counter and passenger waiting lounge. I also added an interior support column for the roof using a piece of unpainted styrene H channel, and got to work printing some scaled to size vending machines to fill out the waiting room area.

Phills Harbour Travel Centre received a two-tone brick building, similar in design to Grafton Station.

Skinning the building turned out to be an easy and rewarding project, thanks to some 3D printed brick sheets I also found on eBay. Printed on a vinyl-like paper, the bricks had that rough texture and simply need to be cut to shape and glued to the styrene shell using some water based craft glue so as not to leach the colour. To break up the monotony of a plain one-coloured brick wall, I embedded two strips of the self-adhesive printed brick paper (also covered in clear self-adhesive wrap), that I'd trimmed to two brick width heights with scissors. I placed one strip at platform height, and stuck the other nicely between the door frame and below the rear window height, making trimming around the window areas so much easier. For this exercise I put away the ruler, and could simply cut to the nearest brick height, glue and repeat until finished.

The unpainted window and door frames look close enough to aluminium frames.

The shiny brown brick trim contrasts nicely with the rough tan colours of the 3D brickwork, and looks more like glazed decorative tiles. I'd put aside the oversized convenience store fencing, and instead fashioned it into an aluminium awning to wrap around the main corner of the travel centre.

The roof will get some special treatment after I build a row of roof-mounted air-conditioners.

I think everyone knows the type of modern awning I've tried to represent; the stupid architecturally-designed type that protects you from neither the sun or the rain yet seems to lend itself to building designs all the same. Anyway, its there for passengers to complain about when boarding the train.

The test-fit to ensure the travel centre matches its surroundings.

With the outside of the building now skinned in 3D brick paper, I test-fit the building to see how else I could improve its appearance. There was enough 3D brick paper left over for me to do the two inside facing walls, so off the floor came again, and I bricked the inside of the travel centre to the height of the top decorative brown brick trim. I need to glue the window panes to something other than textured paper, so simply left the top of the inside wall an unpainted grey.

The waiting room needed some extra interior details thanks to those big, wide windows!

Before cutting and fixing the Evergreen clear styrene window panes to the main floor to ceiling window areas, I glued my printed vending machines to the back wall. Along with the Coca-Cola, Pepsi Max and Smith's Crisps vending machines, there is also a coffee machine, map of the Sydney Trains network, three Telstra pay phones, an Xplorer poster and some vintage next train destination boards that were fictitiously salvaged from the previous station and put on display inside the new travel centre. I took this photo before adding the window glass so that the interior detail would be more visible. As for the unpainted awning, window and door frames? I'm leaving them that way. I've cleaned enough office windows with my cleaning business to know that aluminium frames look silver-grey.

Phills Harbour Station, with Philden visible through the mouse-hole at the far end of the layout.

Also added to the outside of the building were two almost unnoticeable signs. The one above the door actually says 'waiting room' and 'toilets', complete with the disabled symbol. The other is a photo of the actual Countrylink 'coaches' sign that once stood at this end of my layout when it was just staging. I photographed it, reduced it in size and printed it out before covering them with the clear self-adhesive wrap and gluing it to some card. After trimming it to size I stuck it to the underside of the aluminium awning directing passengers down the ramp towards the waiting road coach connection. It's a nice bit of trivia to have incorporated into my own layout. I now only have to wait for someone to produce a Countrylink road coach in HO scale to park between the platform and the backdrop.

My newly arrived NDFF hoppers drop some ballast on the tracks alongside the new station.

Although the nuts and bolts of the travel centre are now finished, the model is far from complete. I still have to build a row of roof mounted air-conditioning units, a skylight and add the station name signs to the platform before the first 'official' train will arrive at Phills Harbour. So for now, railfans will have to be content with watching Railcorp run ballast trains into the newly constructed platform road. These freshly painted NDFF hoppers arrived only today, and straight out of the box look fantastic. Thanks to flipping some items on eBay and Australian Modeller's 20% Off Black Friday Sale, I was able to add these and some Freightcorp NQYY container wagons and new containers to the layout, so expect to see some more photos of these in action in the near future.

While Phills Harbour is purely a fictitious station, I think I've captured the look and feel of a 90's era Countrylink Travel Centre as I remember them appearing around the turn of this century. With Philden station just visible through the mouse-hole at the far end of the layout, it gives me a decent enough run to shuttle my 2 car Xplorer train back and forth from the outback to the sea. Once I add some lights to the station area and around 20-30 passengers waiting inside for the train to arrive, Phills Harbour will become one exciting little railway station.

See also; Building the Beach Station

Wednesday 27 September 2017

Signal Box Part Two


After completing my small New South Wales signal box in my last post, I found myself staring long and hard at the photos I had taken of Neath Signal Box in the Hunter Valley. While it captured the essence of the hardy little survivor from the steam age, I soon realised that I was only going to get one chance to make this look like a replica of the original before gluing it into place on my layout. And that meant taking a scalpel to the so-far finished model to give the building some cosmetic surgery.

The long vacant concrete slab still needed some modification to fit the signal box's shape.

With the assembly and painting of the Walker Models kit already finished in my Signal Box Part One post, I started by testing that the structure was going to fit on the concrete slab I had built into position two years earlier when first constructing my layout. It turned out it didn't. Fortunately the building fitted perfectly between the lengthwise gap I'd left between the fencing. The foundations however were about 9 mm too narrow for the width of the building, which called for me to scrape away some of the scenery base and cut, paint and glue a fifth strip of balsa foundation in the area shown above.

Leftover flextrack ties or sleepers and some 1.5 mm round polystyrene make for easy line-side fencing.

Next up was the white metal post and rail fence shown in the photo. For this I cheated a little and used some 1.5 mm round styrene strip shoved through the holes of some plastic PECO sleepers or ties that were trimmed from a scrap piece of flextrack. I then pre-drilled the holes where the fence would sit alongside the track, and cut the sleepers to the desired height.

I glued the fence into position as I constructed it.

With the extra strip of balsa wood foundation now secured in place, I then glued the sleeper posts with the styrene rod in place into the pre-drilled holes and fixed a second railing to the top using some super glue. I came back to paint the posts white later.

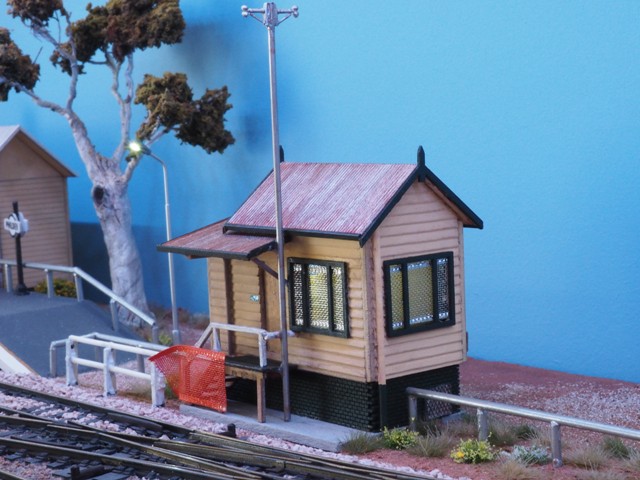
Some orange paint applied to my silver mesh ribbon turns it into some modern orange safety barrier mesh.

Next I turned my attention to the orange safety barrier mesh that had been tacked onto the bottom of the stairs in the photo. Using the same silver ribbon as I did for the security screen mesh on the windows, I painted this with some old Humbrol Enamel No. 18 Orange and set is aside to dry while I turned my attention to the awning supports. There is a strip of piping conduit on the corner of the building that runs all the way from the roof awning to the ground. I cut this using the same 1.5 mm round styrene strip and glued it to the painted using some balsa cement before painting it in the same Senco Off White Acrylic that I used for the weatherboards. I then matched the bottom of the styrene strip to the photo by painting in in the matching Tamiya XF-11 J.N. Green that I used for the brickwork.

Finally I cut the cross beam supports away from the side roof fascia, and also the platform awning support post from the corner of the handrail. Turning to my box of scrap parts leftover from my Faller Cement Works kit, I found a leftover section of 1 mm diameter drain pipe complete with a 45 degree angle bend, and used this as the awning down pipe that is awkwardly positioned between the signal box and the stairwell. I then used a leftover off-cut from this to glue the angled awning support beam that can be seen beside the door on the original. I then drew the latchbolt onto the balsa door with a black pen, and added the blue rectangular security company sticker to the left of the door.

The end result viewed in daylight, and once more out of place against the Caloundra skyline, 

My photos also showed an interesting radio antennae that was anchored to the platform base and platform awning. In the photo it is quite tall, and I guessed it to be around 4.5 metres tall. So I cut another length of 1.5 mm round styrene strip to a height I thought looked right, and then glued two angle brackets from my leftover kit scrap-box either side of it before painting it with my silver paint pen. Finally I could then add all these signature pieces to my finished model, and weather it accordingly.

I next added the LED light and glued the structure to the layout.

To add the tiny LED light inside the signal box, I taped the wire to a 1.5 mm x 40 mm high strip of styrene rod and shoved it up from underneath the layout into the pre-drilled holes in both the concrete slab and the base of the Walker Models building before gluing the signal box in place on my layout. The styrene riser holds the LED just above the height of the window frame so that it is not visible through the security mesh windows. If ever I need to replace the LED, it can be pulled back out from underneath.

The completed signal box now stands guard by the entry to Philden Station.

On the rear of the signal box I added a resin cast silver power metre box. The resin casting was a seconds sample given to me by Stuart from Walker Models to play around with, and I just gave it my silver paint pen treatment followed by a little dab of Rustall. I don't know if there was one on the back of the signal box as it was the one side I forgot to photograph when I visited the Hunter Valley in 2016. But for the sake of adding a little interest, I think it looks pretty neat.

Its a little bit ramshackle, but still structurally strong. Just what I was aiming for.

I measured the length of the orange safety barrier mesh before I trimmed it to ensure it just tucks messily in behind the white track-side safety fence. I've set my model in the era between 2002-2005, and the photographs I took of the building a decade later in 2016 show the building in a little worse condition and the safety barrier near trampled to death. So for arguments sake, we'll just say that this captures the beginnings of trespassers pushing their way through the safety barrier.

The end result was a pleasing enough match to Neath Signal Box. That's me on a visit in May 2016.

Since purchasing this kit two years ago, Walker Models have since released a newer version of the Neath Signal Box kit that is more accurate when it comes to the window sizes, roof awnings and supports and the shape of the platform as you can see on the real life version above. The original version I have just shown you how to build is now sold as the small NSWGR Signal Box. For myself, I'm glad I stuck with building the original kit, as it still enables me to keep the bus set down area on my layout that sits between the backdrop and the end of the railway station platform. Making the few cosmetic changes has enabled me to at least capture the essence of that day back in May 2016 when I visited what remained of Neath Railway Station, didn't see any trains, but at least had a great dinner at the nearby Neath Hotel.

See also; Signal Box part One

Tuesday 19 September 2017

Signal Box Part One


I've purposefully held-off from building this NSW Signal Box kit despite having told everyone my bookshelf layout was finished. Regular readers of my blog would have noticed the vacant concrete slab in front of all the photos I've posted of busses pulling up beside Philden Station, and probably wondered why it was there.

The concrete slab for the signal box has stood vacant for almost 2 years.

Back when I was still constructing my layout, I purchased one of Walker Model's NSW small signal box kits, (the one based on Neath in the Hunter Valley), built the concrete slab to the dimensions of the model's base, and set it aside. All with good reason. Being a small layout I knew that one day the inevitable would occur, and I'd find myself sitting back, looking at the layout and ultimately becoming a little dissatisfied that it was now all finished. Well, that day did arrive, and rather than feeling disheartened that I still didn't have the room to expand, (or worse still tearing everything up and starting over), I took out the little signal box kit that I had set aside, and took my time enjoying working on something new.

The Walker Models NSW small signal box is a simple but rewarding laser-cut kit building.

The kit's inner shell glues together easily, and the outer laser-cut timber shell simply glues over the top.

In next to no time the building begins to take shape, although the stairs are a fiddly little item all on their own.

I next test-fit the stairs to ensure that everything aligned.

The instructions in the kit drew my attention to the roof pitch where the walls needed to be filed to the same angle as the roof-line. I simply used a sharp hobby knife to angle the top of the walls and also the roof pieces so they fitted perfectly.

After completing the basic shell of the building, it was time to consult my own photos to decide how I would finish the little signal box. Those who read my final Railway Reminiscing post on Neath over on my author blog, will appreciate that I wanted to try and capture the essence of what Neath Signal Box looks like today. I wanted a structure that would complement Philden Railway Station, rather than trying to model the signal box exactly. So the photo below served purely as a guide.

Neath Signal Box in the NSW Hunter Valley, as I photographed it on a visit in May 2016.

Look closely beyond the rundown appearance of the small stairway, and the first thing you notice is the metal security screens bolted over the windows. They have obviously done their job when it comes to stopping rocks being thrown through the glass windows. Also, the signal box door looks as though it had been replaced at some point. As it was nothing like the door that came supplied with the kit, I simply made a plain door using some 2 mm balsa wood. With my layout set between 2002 and 2005, I wanted to include these modern touches on a still existing remnant from the steam era.

I used some silver mesh ribbon glued to the inside of each window frame to get the desired look.

The ribbon was the same one that I used to construct the chain mesh fence along the cement plant siding, (see a between shows refresh for a recap). I cut and then glued each piece to the inside of the window frame for a neater appearance. The chain ribbon is see through and provided such a good effect, that I didn't bother fitting the clear window panes on the building.

I then put the finished security screen clad windows aside to paint the signal box and roof.

I next painted the building in matching colours to my photographs, of which the weatherboard colour also happened to be the matching shade of cream on my existing A-4 station. I used Tamiya XF-11 J.N. Green for the bottom brickwork and fascia boards, and a well watered down Senco Acrylic Off White for the signal box weatherboarding. The roof received a quick-and-easy treatment from my trusty silver paint pen, and when dry, it glued into position with a generous smear of craft glue.

The finished result looks pretty neat in broad daylight, and captures a lot of the feel from the prototype.

The silver bracket and square panel at the base were just leftover bits from my junk box.

I took the painted model outside to photograph it in broad daylight, although it does look a little out of place pressed against Caloundra's skyline instead of a small Hunter Valley town. More importantly, building the little signal box has breathed some fresh life back into my small layout.

Although I added some clutter to the building courtesy of some leftover bits from my junk box, the model is still far from finished. Next up I will add an LED light before installing the signal box beside Philden Station. To replicate the photo a little better, there is also some bright orange plastic safety barrier mesh and a white post and wire fence alongside the track to be added. While in the odd-shaped corner alcove of the building there is a twiggy frame of a dead bush clinging to the side of the signal box. They're both small details that will give the model a big dose of atmosphere. But as usual, I'll let that be a story for another day.

See also; Railway Station Part Six